
As a bass guitarist, it is essential to have a solid understanding of the minor triad and its various applications. In this comprehensive guide, we will explore the construction, notation, fingerings and practical uses of the minor triad.
What is a Minor Triad?
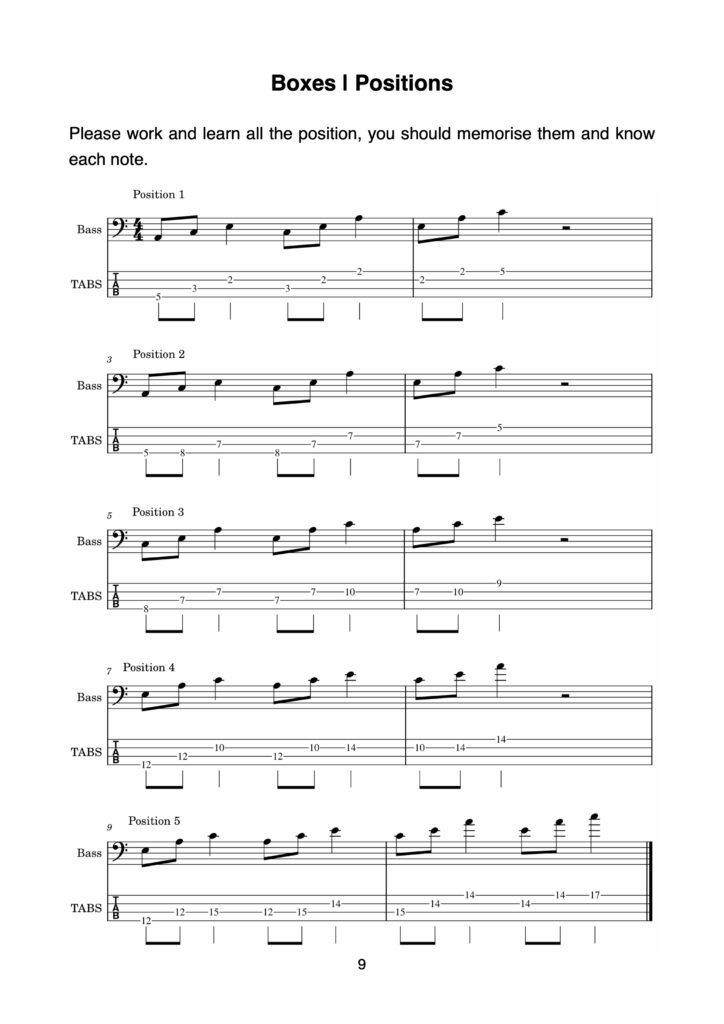
A minor triad consists of three fundamental notes: the root which gives the chord’s name, a minor third defining its minor quality and a fifth that resolves back to the root. These elements create the distinctive character of a minor triad. To truly master any triad, it’s crucial to explore all possible inversion, positions and fingerings.
Break down and rearrange what you learn, remember that versatility is key. Experiment with different shapes and fingering across the fretboard. Soon enough, you’ll find yourself crafting your own unique patterns.
The C Minor Triad is used over minor chords including Cm6, Cm7, Cm9 and Cm11.
Notation of Minor Triads
When notating a minor triad, there are several common conventions. The most widely used chord symbol for a minor triad is the root note followed by a lowercase ‘m’. For example, an A minor triad is notated as Am, while a C# minor triad is notated as C#m.
Another notation option is using a dash (-) after the root note. For instance, an A minor triad can also be notated as A-, or a C# minor triad as C#-. While this notation can be harder to read in low-light situations, it remains a valid alternative.
Additionally, some musicians use the suffixes “mi” or “min” after the root note to indicate a minor triad. These suffixes are easily recognizable and unmistakably represent a minor chord. For example, a C minor triad can be notated as Cmi or Cmin.
Fingerings for Minor Triads
Now let’s explore the fingerings for playing minor triads. The most common and recommended fingering for a minor triad starts with your first finger on the root note. In a one-finger-per-fret position, use your fourth finger to play the flat third and your third finger to play the fifth.
As you practice and become more comfortable with these fingerings, you can start experimenting with different shapes and positions across the fretboard. This versatility will enable you to explore various voicings and create unique patterns that suit your musical style.
Inversions of Minor Triads
In addition to the standard root position of a minor triad, it is crucial to explore inversions. Inversions are different voicings of a chord that rearrange the order of its notes, while still maintaining the same fundamental structure.
The first inversion of a minor triad involves moving the root note up one octave. For example, in a C minor triad, the first inversion would have E flat as the lowest note, followed by G and then C. This inversion provides a different sonic character and can be used to create melodic bass lines.
The second inversion of a minor triad moves the root note up two octaves, resulting in the fifth as the lowest note, followed by the root and then the third. Continuing with the C minor triad example, the second inversion would consist of G as the lowest note, followed by C and then E flat.
By exploring inversions, you can expand your harmonic vocabulary and create more interesting bass lines.
Practical Application of Minor Triads
Minor triads are widely used in various musical contexts. When playing bass lines it is essential to emphasise the chord’s root note on the first beat of each bar. This creates a strong foundation and helps establish the tonality of the chord progression. From there, you can experiment with different note choices emphasising the other chord tones.
It’s worth noting that while emphasising the chord tones is a general guideline, there are no strict rules. As you gain experience and develop your musical ear you can bend or break any guidelines.
By familiarising yourself with the construction, notation, fingerings and practical applications of minor triads, you can add depth and musicality to your playing. Remember to experiment with different shapes, fingerings and inversions to develop your unique voice. With practice and dedication, you will unlock new possibilities, I often go back practising triads and I always find a new or interesting way to use them.
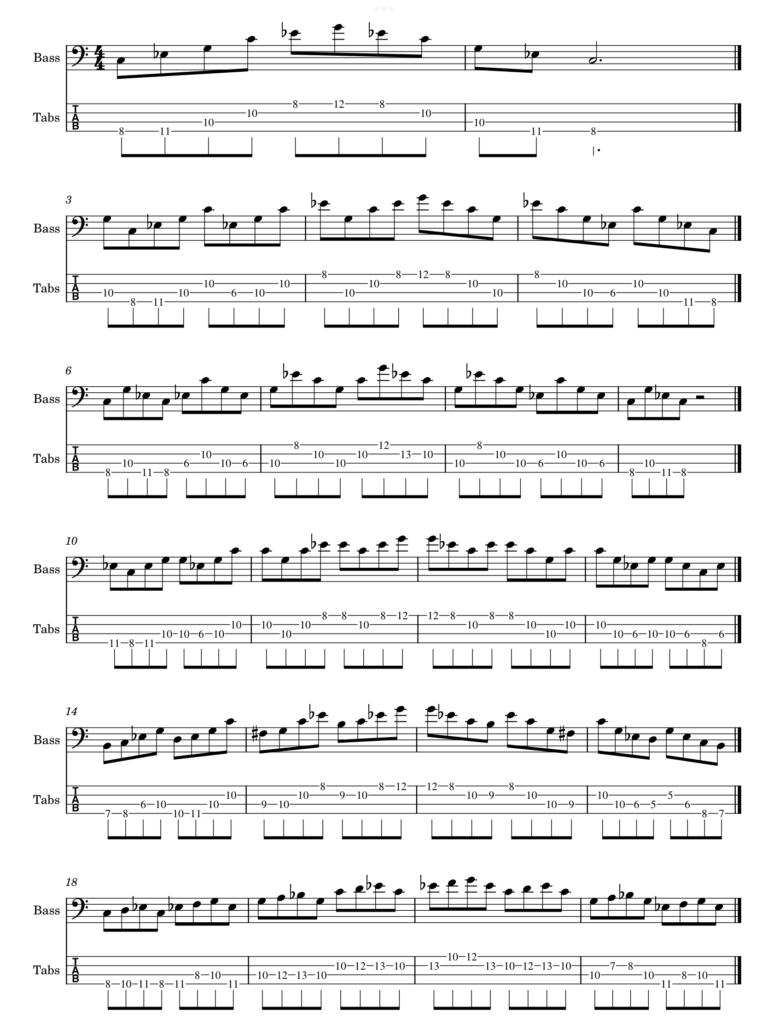
Examples of Minor Triads
To solidify your understanding of minor triads, let’s explore some practical examples. In the following exercises, you will find different patterns that incorporate the minor triad. These exercises will help you internalise the shapes and fingerings while developing your sense of rhythm and musicality.
Remember to start slowly and gradually increase the tempo as you become more comfortable with the patterns. Pay attention to the quality of your sound and accuracy of finger placement.
Basic Exercises
Study Plan
- Triads Shapes – Start by exploring low, medium and high positions of the triad and play the exercises.
- Triads Applications – Apply the various triads to different chords and explore the other available triads.
- Triads Permutations – Practice various permutations to build dexterity and familiarity.
- Triads Fills – Learn fills and use them in your playing to add creativity.
- Practical Application – Take a groove you enjoy and apply all the concepts you’ve practiced.